Red Velvet Crinkle Cookies With a Double Sugar Coat
In this article:
- Why the double roll decides the crinkle
- Choosing cocoa and coloring for a true Christmas red
- Ingredients
- Mixing, chilling and baking the cookies
- Keeping the red bright and the cracks open
- Spread, pale sugar and other troubleshooting
- Serving and packing the Christmas cookie box
- Make ahead and freezing plan
- Color, cocoa and chip swaps
- Your crinkle cookie questions, answered
- The red every cookie box was missing
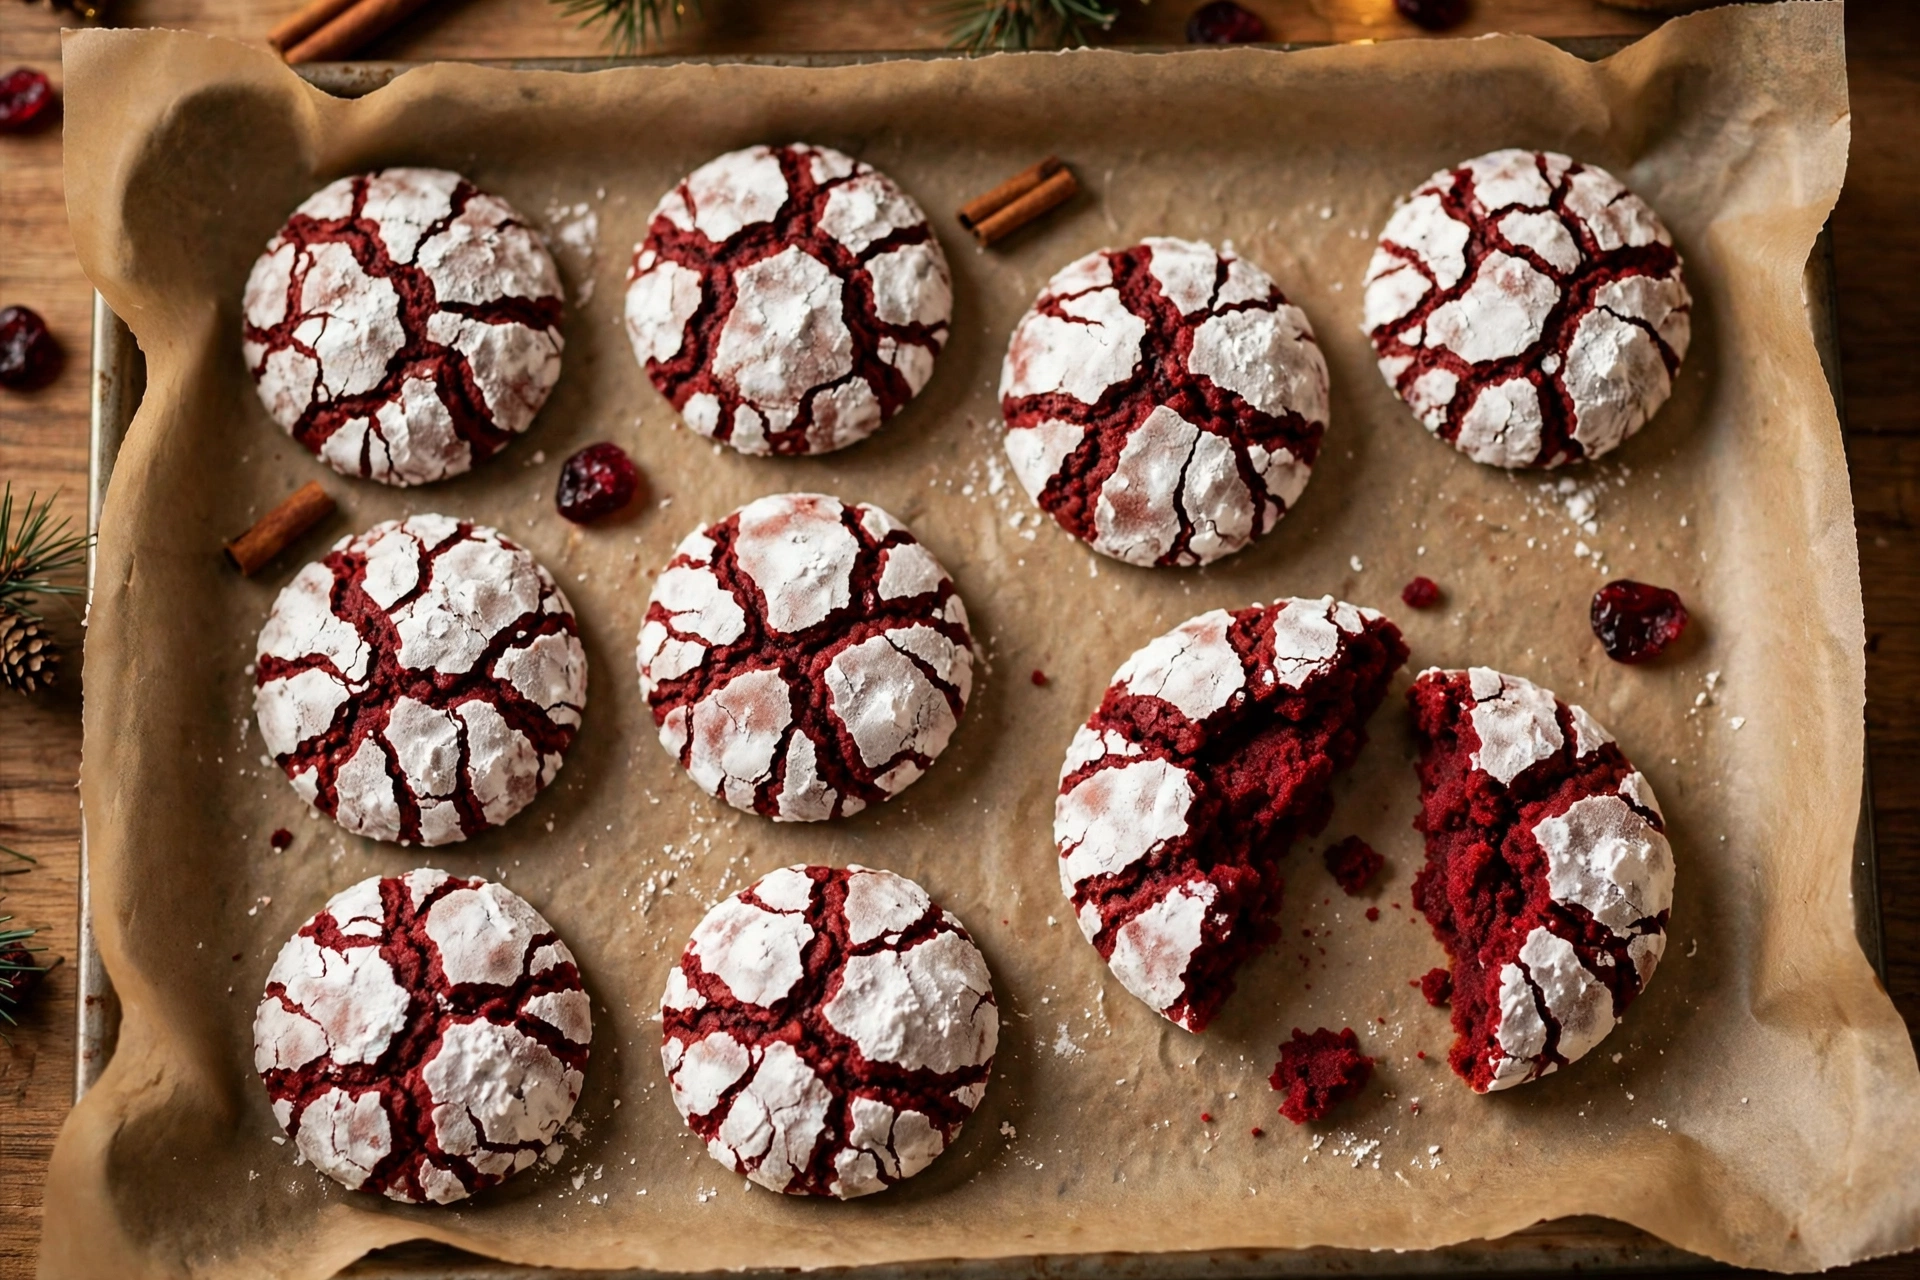
Red velvet crinkle cookies are the loudest cookie on the Christmas tray. Deep red, split open with white cracks, soft and fudgy in the middle, and gone faster than anything else in the box.
The contrast is the whole design. A cocoa dark, slightly tangy crumb under a snowy coat, with the cracks opening as the cookies puff, so every cookie looks hand finished even though the dough takes twenty minutes.
Most recipes for this cookie start with a boxed cake mix, and it shows in the flavor. This one is mixed from scratch, with real butter, natural cocoa and buttermilk, and it is engineered around the step the cake mix versions skip.
That step is the double roll, and it costs nothing. Granulated sugar first, powdered sugar second, and the crinkle that usually melts into a pink smear stays bright white to the last cookie.
Why Red Velvet Crinkle Cookies Work: the Double Roll Decides the Crinkle
Red velvet crinkle cookies crack because the dough puffs and spreads under a coat that cannot stretch. The baking powder lifts the ball, the surface dries and splits, and the split shows the red dough against the white sugar like a glaze crackle.
The coat is where most batches fail. Rolled once in powdered sugar, the coat drinks moisture from the dough as it sits, and in the oven it melts into the surface before the cracks can open. The cookies come out pink and dusty instead of red and white.
The double roll fixes that with a dry barrier. A first roll in granulated sugar gives the ball a coarse, dry shell, and the generous second roll in powdered sugar sits on top of it instead of soaking in. The powdered coat stays dry, so the cracks open white.
The chill is the second half of the system. An hour in the fridge firms the butter so the balls hold their shape long enough for the coat to crack. Warm dough slumps in the first minutes and tears the coat into streaks.
Natural cocoa is the quiet third decision. It reacts with the vinegar, the buttermilk and the baking soda to lift the cookies and set the classic red velvet tang, and its lighter color lets the red coloring read as red instead of brown.
Choosing Cocoa and Coloring for a True Christmas Red
Use natural unsweetened cocoa powder, the regular kind, not the Dutch processed kind. Dutch cocoa is alkalized, so it darkens the crumb toward brown and dulls the reaction that helps the cookies rise and taste like red velvet.
One tablespoon of red gel coloring is the amount that survives the cocoa. Gel is concentrated, so it colors deeply without thinning the dough, which is why the cookies in the photos of weaker recipes, made with half a teaspoon, read pink brown instead of festive.
Liquid coloring works if gel is what you do not have, at 2 tablespoons, but reduce the buttermilk by 1 tablespoon to keep the dough firm. The color will be a shade softer, still clearly red once the white coat frames it.
The vinegar sounds odd and tastes like nothing. Its acid is part of the red velvet formula, reacting with the baking soda for lift and keeping the red bright in the oven’s heat.
Do not be tempted to skip the coloring and call them cocoa crinkles. The red is the identity of this cookie, the reason it anchors a cookie box, and the white cracks need the contrast to show.
Ingredients
- 2 1/4 cups all purpose flour
- 1/4 cup natural unsweetened cocoa powder
- 1 teaspoon baking powder
- 1/4 teaspoon baking soda
- 1/2 teaspoon fine salt
- 1/2 cup unsalted butter, softened
- 1 cup granulated sugar, plus 1/3 cup for rolling
- 1/4 cup light brown sugar, packed
- 2 large eggs, at room temperature
- 2 tablespoons buttermilk
- 1 teaspoon white vinegar
- 2 teaspoons vanilla extract
- 1 tablespoon red gel food coloring
- 3/4 cup powdered sugar, for rolling
The two sugars in the dough do different jobs. Granulated sugar gives the edges their set, and the smaller amount of brown sugar keeps the centers soft and fudgy for days.
Mixing, Chilling and Baking the Cookies
- Whisk the flour, cocoa powder, baking powder, baking soda and salt together in a medium bowl.
- In a large bowl, beat the butter, 1 cup of granulated sugar and the brown sugar with a mixer for 2 to 3 minutes, until pale and fluffy.
- Beat in the eggs one at a time. Mix in the buttermilk, vinegar, vanilla and red gel coloring until the batter is an even deep red.
- Fold the dry ingredients into the wet ingredients with a spatula until a soft, sticky dough forms and no flour streaks remain.
- Cover the bowl and chill the dough for at least 1 hour, or up to 24 hours. Cold dough is what lets the coating crack instead of melt.
- Heat the oven to 350 degrees F. Line two baking sheets with parchment paper. Put the 1/3 cup granulated sugar in one shallow bowl and the powdered sugar in another.
- Scoop the dough into balls of about 1 1/2 tablespoons. Roll each ball first in the granulated sugar, then roll it generously in the powdered sugar until it looks fully white.
- Set the balls on the prepared sheets 2 inches apart. Do not flatten them.
- Bake for 11 to 12 minutes, one sheet at a time, until the cookies are puffed and deeply cracked, the edges look matte and set, and the centers are still slightly glossy.
- Cool the cookies on the pan for 5 minutes, then move them to a wire rack to cool completely.
Keeping the Red Bright and the Cracks Open
Roll with confidence. The powdered sugar coat should look almost excessive in the bowl, a thick white shell with no red showing through, because the dough will drink a little of it no matter what you do.
Work in small batches once the dough is scooped. Balls that sit at room temperature while a tray bakes warm up, soften and spread flatter, and their cracks widen into webs instead of sharp white splits.
Keep the unrolled dough in the fridge between trays and roll each tray’s balls just before it goes in. Two minutes of planning is the whole difference between a uniform batch and a first tray that outshines the rest.
Bake one sheet at a time in the center of the oven. Two sheets crowd the heat, the lower tray steams, and steamed coats melt instead of cracking.
Pull the cookies while the centers still look slightly glossy. They finish setting on the hot pan, and that glossy center is the fudgy middle everyone describes when they ask for this recipe.
Spread, Pale Sugar and Other Troubleshooting
Cookies that spread into pancakes were rolled warm or baked on a warm sheet. Chill the scooped balls for 10 minutes while the oven heats, and always start a tray on a cool sheet, never the one that just came out.
A coat that vanished means the double roll was skipped or skimped. Granulated sugar first is not decoration, it is the dry barrier, and the powdered layer needs to be generous enough that the ball looks white, not blushed.
Cookies that stayed pale red were made with Dutch cocoa or too little coloring. Switch to natural cocoa, measure the gel at a full tablespoon, and remember the dough darkens a shade as it bakes, so mix it one shade brighter than your target.
Cracks that opened but look gray usually mean an overbake. At 14 minutes the white coat dulls and the center dries. Hold the line at 11 to 12 minutes and trust the pan to finish the set.
A dough too sticky to roll was measured with flour scooped from the bag, which packs extra, or not chilled long enough. Give it the full hour, and roll with slightly damp hands if the day is warm.
Serving and Packing the Christmas Cookie Box
These cookies are the red in a box that otherwise runs brown and beige. Pack them beside gingerbread crinkle cookies and the two crinkles, one spiced and one cocoa red, make the box look planned instead of gathered.
They sit beautifully next to Italian ricotta cookies from yesterday’s batch, where the lemon glaze and the red crumb play off each other, and both cookies stay soft for the same number of days.
For a classic box, add snowball cookies and spritz cookies. Four shapes, four textures, two of them white coated, and the red velvet is the one people photograph first.
Pack the crinkles in a single layer or between sheets of parchment, coat side up. Stacked directly, the powdered coats print onto the cookies below and the white goes patchy in transit.
On a serving tray, a glass of cold milk is the traditional partner, and the cookies hold their own next to coffee after dinner. Serve them the day they are baked for the sharpest cracks, though they stay soft and bright for a week in a tin.
Make Ahead and Freezing Plan
The dough holds in the fridge for 24 hours, and it actually improves. The cocoa blooms, the color deepens, and the chilled dough rolls cleaner than a fresh batch, so making it the night before is the professional move.
For a longer hold, freeze the coated balls. Roll them in both sugars, freeze them solid on a tray, then bag them with the date. Frozen coats crack exactly like fresh ones, which is more than the cake mix versions can say.
Bake from frozen at the same temperature with 1 extra minute. No thawing, no re rolling, and a tray of Christmas cookies appears 13 minutes after the craving or the doorbell.
Baked cookies keep a week in an airtight tin at room temperature, layered with parchment. A slice of sandwich bread in the tin keeps them soft, swapped out every couple of days.
Do not refrigerate the baked cookies. The fridge dries the crumb and dulls the coat, and these are at their best at room temperature, where the center stays fudgy.
Color, Cocoa and Chip Swaps
White chocolate chips, folded in at 3/4 cup, are the classic red velvet partner. They sweeten the crumb and speckle the cracks, so skip the granulated sugar roll if you add them, because the chips already help the coat.
For a cream cheese note without chips, beat 2 ounces of softened cream cheese into the butter. The tang deepens, the dough gets a little softer, and the chill needs the full hour, not a minute less.
A green velvet version uses the same dough with green gel coloring and reads as Christmas alongside the red. Half a batch of each, boxed together, is the most photographed cookie gift this kitchen makes.
For a deeper chocolate cookie, raise the cocoa to 1/3 cup and drop the flour by 2 tablespoons. The color goes burgundy rather than scarlet, the flavor goes fudgy, and the cookie becomes the chocolate lover’s pick of the box.
Out of buttermilk, use 2 tablespoons of milk with the vinegar already in the recipe doing the acid’s work. The crumb stays tender, and nobody at the cookie exchange will know the difference.
Your Crinkle Cookie Questions, Answered
Why did the powdered sugar disappear on my crinkle cookies?
The coat soaked into the dough before it could crack. It happens when the dough is warm or the roll is a single powdered one. Chill the dough a full hour and roll first in granulated sugar, then generously in powdered sugar, so a dry barrier protects the white coat.
Gel or liquid food coloring for red velvet cookies?
Gel, at 1 tablespoon, gives the deep Christmas red without thinning the dough. Liquid coloring needs about 2 tablespoons for the same depth, so cut the buttermilk by 1 tablespoon to keep the dough firm enough to roll and crack.
Can I freeze the dough balls after coating them?
Yes, and they bake beautifully from frozen. Freeze the double rolled balls solid on a tray, bag them, and bake at 350 degrees F for 12 to 13 minutes straight from the freezer. The cracks open the same as fresh.
Natural or Dutch cocoa for red velvet crinkles?
Natural cocoa, always, for this cookie. Dutch cocoa is alkalized, so it dulls the red toward brown and mutes the acid reaction that gives red velvet its lift and tang. Natural cocoa keeps the crumb bright and the flavor classic.
How do the cookies stay soft for a week?
Underbake them by a breath, pull them while the centers look slightly glossy, and store them airtight with parchment between layers. A slice of sandwich bread in the tin, changed every two days, keeps the moisture where it belongs.
Can I make them without food coloring?
You can, and the cookies become cocoa crinkles, still delicious and still cracked white. They lose the red velvet identity, though, so for a Christmas box, keep the coloring and let the red do its job.
The Red Every Cookie Box Was Missing
Red velvet crinkle cookies ask for a cold bowl of dough, two bowls of sugar and the discipline to pull them at 12 minutes. The payback is the brightest, softest cookie on the tray, from scratch, with no box of mix anywhere in sight.
The method is honest about its pressure points: natural cocoa, a full tablespoon of gel, a real chill and the double roll. Master those and the crinkle stops being luck and becomes a system you can repeat all December.
Bake one tray and watch the box change. Every other cookie is brown, gold or white, and then there is the red, cracked open like porcelain, doing the decorating for the whole gift.
Nutrition per serving, estimated for 24 cookies: Calories 165, Total Fat 7 g, Saturated Fat 4 g, Unsaturated Fat 2 g, Trans Fat 0 g, Carbohydrates 25 g, Fiber 1 g, Sugar 17 g, Protein 2 g, Sodium 115 mg, Cholesterol 30 mg. Ingredient values are informed by USDA FoodData Central.
Print
Red Velvet Crinkle Cookies With a Double Sugar Coat
From scratch red velvet crinkle cookies with natural cocoa, buttermilk and gel coloring, rolled first in granulated sugar and then in powdered sugar so the cracks open bright white. Total time includes the 1 hour chill.
- Total Time: 1 hour 32 minutes
- Yield: 24 cookies 1x
Ingredients
- 2 1/4 cups all purpose flour
- 1/4 cup natural unsweetened cocoa powder
- 1 teaspoon baking powder
- 1/4 teaspoon baking soda
- 1/2 teaspoon fine salt
- 1/2 cup unsalted butter, softened
- 1 cup granulated sugar, plus 1/3 cup for rolling
- 1/4 cup light brown sugar, packed
- 2 large eggs, at room temperature
- 2 tablespoons buttermilk
- 1 teaspoon white vinegar
- 2 teaspoons vanilla extract
- 1 tablespoon red gel food coloring
- 3/4 cup powdered sugar, for rolling
Instructions
- Whisk the flour, cocoa powder, baking powder, baking soda and salt together in a medium bowl.
- In a large bowl, beat the butter, 1 cup of granulated sugar and the brown sugar with a mixer for 2 to 3 minutes, until pale and fluffy.
- Beat in the eggs one at a time. Mix in the buttermilk, vinegar, vanilla and red gel coloring until the batter is an even deep red.
- Fold the dry ingredients into the wet ingredients with a spatula until a soft, sticky dough forms and no flour streaks remain.
- Cover the bowl and chill the dough for at least 1 hour, or up to 24 hours. Cold dough is what lets the coating crack instead of melt.
- Heat the oven to 350 degrees F. Line two baking sheets with parchment paper. Put the 1/3 cup granulated sugar in one shallow bowl and the powdered sugar in another.
- Scoop the dough into balls of about 1 1/2 tablespoons. Roll each ball first in the granulated sugar, then roll it generously in the powdered sugar until it looks fully white.
- Set the balls on the prepared sheets 2 inches apart. Do not flatten them.
- Bake for 11 to 12 minutes, one sheet at a time, until the cookies are puffed and deeply cracked, the edges look matte and set, and the centers are still slightly glossy.
- Cool the cookies on the pan for 5 minutes, then move them to a wire rack to cool completely.
- Prep Time: 20 minutes
- Cook Time: 12 minutes
Nutrition
- Serving Size: 1
- Calories: 165
- Sugar: 17
- Sodium: 115
- Fat: 7
- Saturated Fat: 4
- Unsaturated Fat: 2
- Trans Fat: 0
- Carbohydrates: 25
- Fiber: 1
- Protein: 2
- Cholesterol: 30