In this article:
Peppermint White Chocolate Fudge | Creamy, Minty and Festive
Why This Recipe Works
Peppermint white chocolate fudge is the rare holiday candy that tastes like a professional confection but asks nothing more of you than melting, stirring, and chilling. The sweetened condensed milk does the heavy lifting, giving the fudge its dense, sliceable texture without a candy thermometer or a single minute at soft-ball stage. Real white chocolate, not candy melts, melts into a silky base that carries the peppermint flavor cleanly instead of burying it under waxy sweetness.
A small knob of butter adds gloss and a tender bite, while a pinch of fine sea salt sharpens the sweetness so each square tastes balanced, not cloying. Crushed candy canes do double duty here, folding minty crunch through the center and creating that classic red and white confetti on top.
Because there is no baking and no fussy technique, this is a genuinely beginner friendly recipe that still looks like a gift shop showpiece. Make it once and you will understand why it disappears from dessert trays faster than anything else on the table.
Peppermint white chocolate fudge has been my December non-negotiable for years, the one candy I make before the tree is even decorated. It started as a last minute gift for neighbors and turned into a tradition, because a pan of this fudge takes about ten minutes of actual work. The magic is in the contrast: cool peppermint against mellow white chocolate, creamy squares against the snap of crushed candy cane.
It is the kind of recipe that looks impressive in a tin lined with parchment, tied with ribbon, and handed to a teacher or a mail carrier. Kids love the festive colors, adults love that it is not tooth achingly sweet, and the cook loves that the whole thing sets in the fridge.
If your holiday calendar is already bursting, this is the dessert that fits into the cracks: ten minutes today, slicing tomorrow. By the end of this guide you will know exactly how to nail the texture, avoid the one big white chocolate pitfall, and package it like a pro.
 ” alt=”Peppermint white chocolate fudge squares topped with crushed candy canes on a festive holiday platter” />
Peppermint White Chocolate Fudge Flavor and Texture
The first thing you notice is the cool rush of peppermint, bright and clean, arriving a half second before the white chocolate sweetness settles in. Good peppermint extract tastes like a crisp winter morning, not like toothpaste, which is why the recipe uses a measured teaspoon rather than a heavy hand. The white chocolate itself is mellow and buttery, with gentle vanilla and cream notes that round out the sharper edges of the mint.
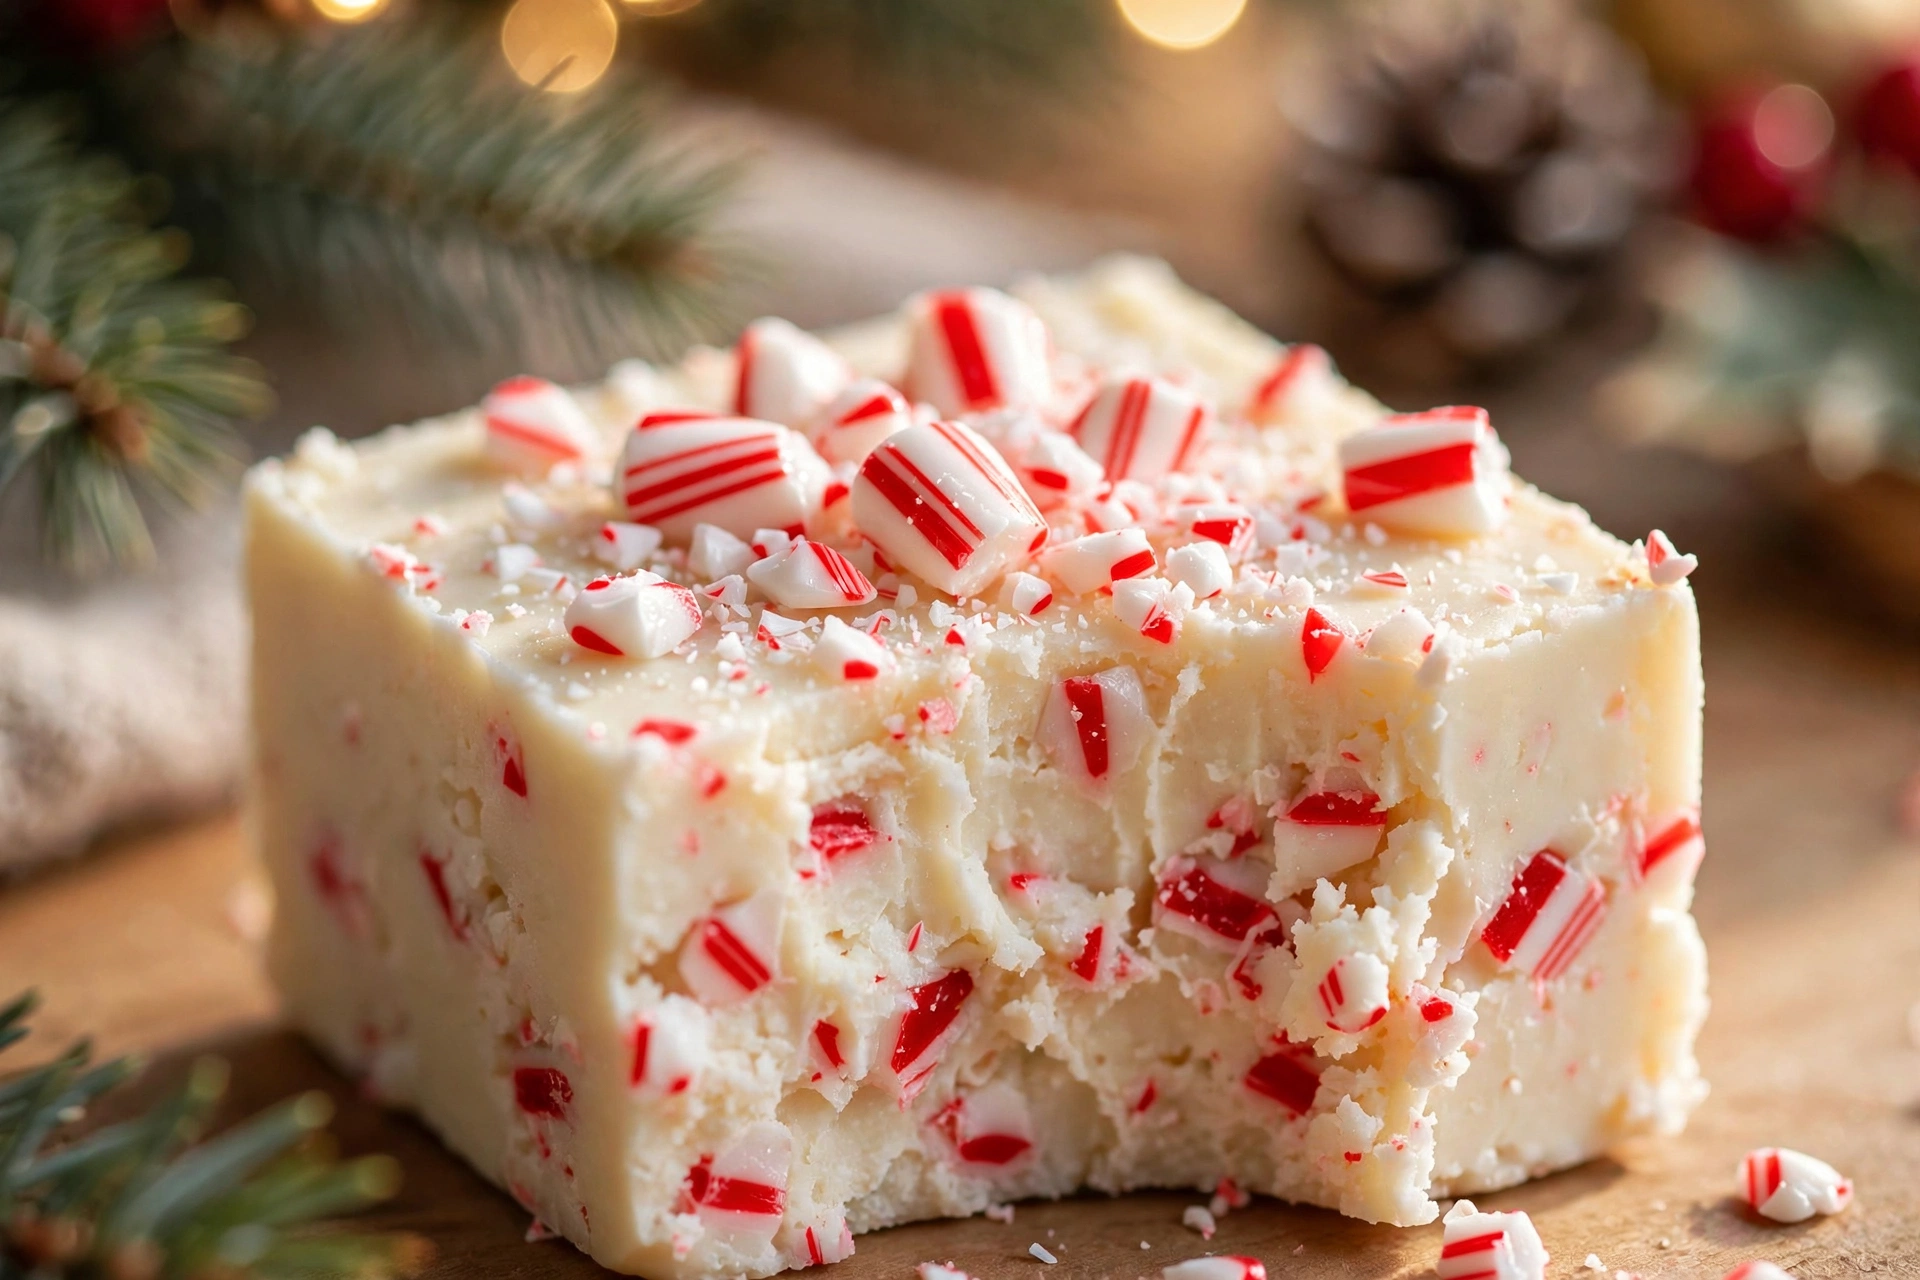
Texture is where this fudge earns its reputation: dense and smooth, firm enough to hold a clean square, yet it softens the moment it hits your tongue. It is not the grainy, crumbly fudge of old fashioned candy counters; the condensed milk keeps every bite silky and evenly sweet. The crushed candy canes folded through the middle stay slightly chewy in the center, a pleasant contrast to the creamy base around them.
On top, the candy cane confetti keeps its crunch, so each piece delivers two textures at once: melting cream with a bright peppermint snap. A pinch of salt might sound odd in candy, but it is the quiet hero here, trimming the sweetness so you can actually taste the chocolate and mint. For another white chocolate showpiece on your holiday table, our white chocolate raspberry tiramisu pairs beautifully with this fudge.
Serve it cold from the fridge for the firmest bite and the cleanest peppermint punch, which is how most people prefer it. Let a square sit at room temperature for ten minutes and it turns softer and more truffle like, with the mint mellowing into the background. Either way, one small square is surprisingly satisfying, which makes a single pan stretch across a whole party.
The red and white topping is not just decoration; those candy pieces are little bursts of concentrated peppermint that wake up each bite. It is a simple candy, but the flavor balance is deliberate, and that is what keeps people reaching back into the tin.
Convenience and Time
From the moment you unwrap the chocolate to the moment the pan slides into the fridge, you will spend about ten minutes, most of it stirring. There is no preheating, no mixer, no thermometer, and no standing over a pot praying for soft-ball stage. One saucepan, one spatula, and one lined pan are the entire equipment list, which means cleanup is a quick rinse.
The two hour chill is completely hands off, so you can start the fudge, walk away to wrap gifts, and come back to slice. In a real hurry, forty five minutes in the freezer gets you to the same firm, sliceable point. That speed makes it a genuine emergency dessert, the thing you make the morning of a party when the original plan fell through.
It is also one of the easiest candies to make with kids, since the only heat involved is a gently warmed saucepan and an adult handles the cutting. Like our no bake cranberry pecan praline cookies, this is a true no bake recipe, perfect for busy kitchens and small helpers.
Double the batch across two pans if you are gifting widely; the effort barely increases, but the output feels generous. Few holiday recipes give you this much payoff per minute, which is exactly why it has earned a permanent spot in my December rotation.
Diet Friendly Options
As written, this fudge is naturally gluten free, since none of the six ingredients contain wheat, barley, or rye. Always check your candy cane and chocolate labels if you are serving someone with celiac disease, because manufacturing lines vary. For a dairy free version, swap in dairy free white chocolate chips and a can of sweetened condensed coconut milk, which sets up remarkably well.
Vegan white chocolate chips melt a little faster than conventional ones, so keep the heat low and stir constantly. A sugar free version is possible with stevia sweetened white chocolate chips and sugar free condensed milk, though the texture will be slightly softer. Nut free as written, this fudge is a safe bet for classrooms and offices where nut allergies are a concern.
Whatever version you make, keep the peppermint extract pure and check that it fits your household needs. The structure of the recipe is forgiving, so most swaps succeed as long as the condensed milk base stays intact.
Ingredients
- 3 cups white chocolate chips (18 ounces), good quality with cocoa butter listed first on the label
- 1 can (14 ounces) sweetened condensed milk, not evaporated milk
- 2 tablespoons unsalted butter, cut into small pieces
- 1 teaspoon pure peppermint extract, not mint extract
- 1/4 teaspoon fine sea salt
- 3/4 cup crushed candy canes, divided (1/2 cup for folding in, 1/4 cup for the topping)
Step by Step Instructions
- Line an 8×8-inch baking pan with parchment paper, leaving a two inch overhang on two sides so you can lift the slab out later. Press the paper firmly into the corners for sharp, clean edges.
- Place the candy canes in a zip top bag, seal it, and crush them with a rolling pin into small pieces about the size of coarse crumbs. Avoid grinding them into powder, which turns the fudge pink and gritty. Measure out 1/2 cup for the filling and 1/4 cup for the topping.
- Combine the white chocolate chips, sweetened condensed milk, and butter in a medium heavy bottomed saucepan. A heavy pan distributes heat evenly and protects the chocolate from scorching on hot spots.
- Set the pan over the lowest heat and stir constantly with a silicone spatula, scraping the bottom and corners, until the mixture is completely smooth and glossy, about 5 to 7 minutes. Never let it boil, and never walk away, because white chocolate scorches faster than you expect.
- Remove the pan from the heat immediately and stir in the peppermint extract and the fine sea salt until fully incorporated. The mixture will look slightly looser for a moment, then settle back into a thick, creamy base.
- Gently fold in the 1/2 cup of crushed candy canes with just a few strokes of the spatula. Overmixing at this stage can bleed the red color through the whole batch, so stop as soon as the pieces are evenly distributed.
- Scrape the fudge into the prepared pan and spread it into an even layer, pushing it into the corners with the spatula. Sprinkle the remaining 1/4 cup of crushed candy canes over the top and press them in very lightly so they stick without sinking.
- Refrigerate the pan, uncovered, for at least 2 hours or until completely firm to the touch. For a faster set, freeze for 45 minutes, then move the pan to the refrigerator for 30 minutes more.
- Lift the slab out using the parchment overhang and set it on a cutting board. Cut into 36 small squares with a long sharp knife, running the blade under hot water and wiping it dry between cuts for the cleanest edges. Serve chilled or at room temperature.
 ” alt=”Close-up of a bitten square of peppermint white chocolate fudge showing a dense, creamy texture with candy cane pieces” />
Tips and Tricks for Success
White chocolate is the diva of the chocolate family: it melts at a lower temperature than dark chocolate and seizes at the slightest provocation. Keep your heat truly low and stir without stopping, and your reward is a perfectly smooth base; rush it and you get a grainy, oily mess. The bakers at King Arthur Baking explain exactly why in their guide to melting chocolate, which is worth reading before your first batch.
Water is the enemy here, so make sure your spatula, bowl, and saucepan are bone dry, because even a few drops can make white chocolate seize into a stiff paste. If you want to tint the fudge, use gel food coloring only, since water based colors cause the same seizing problem. If seizing does happen, do not panic: stir in a tablespoon of warm condensed milk and whisk hard, which often brings it back.
Crushed candy canes absorb moisture from the air and turn sticky, so crush them right before you need them and press the topping on just before chilling. On humid days, consider adding the topping garnish right before serving instead, so it stays crisp and bright.
For bakery neat squares, chill the slab thoroughly, then use a hot, dry knife and wipe it clean between every few cuts. If the fudge softens while you work, slide the whole slab back into the fridge for fifteen minutes and continue.
Ingredient Swaps and Variations
Peppermint extract and peppermint oil are not interchangeable by the drop: oil is three to four times stronger, so use just 1/4 teaspoon of oil if you swap. Mint extract, which tastes like spearmint, gives a noticeably different, greener flavor, so stick with peppermint for the classic profile. No candy canes on hand? Crushed starlight mints or any hard peppermint candy work exactly the same way.
For a cookies and cream twist, fold in 1/2 cup of crushed chocolate sandwich cookies instead of the interior candy canes. A dark chocolate drizzle over the set fudge adds a beautiful contrast and a slightly bitter edge that plays well against the mint. King Arthur Baking uses a similar layering trick in their peppermint bark, which makes a great next project if this fudge wins you over.
Chopped white chocolate bars melt even more smoothly than chips if you want to upgrade, since many chips contain stabilizers that resist melting. For gifting, pair the fudge with our salted honey pistachio cookies and homemade cranberry bliss bars in a single box for a trio that covers every craving. A tiny pinch of espresso powder, barely 1/8 teaspoon, deepens the chocolate flavor without adding any coffee taste.
Peppermint White Chocolate Fudge Storage and Make Ahead
Store the cut squares in an airtight container in the refrigerator, layered between sheets of wax paper, and they will stay fresh for up to two weeks. The cold keeps the texture firm and the peppermint bright, which is why the fridge beats the counter for anything beyond a day or two. At room temperature the fudge is safe for about two days in a cool, dry spot, but the candy topping can turn tacky, so the fridge is the better home.
For longer storage, freeze the squares in a single layer on a baking sheet, then transfer them to a freezer bag with the air pressed out for up to three months. Thaw overnight in the refrigerator, not on the counter, so condensation does not make the candy topping weep. This fudge is a dream for make ahead holiday planning: prepare a full batch up to five days before a party and slice it the morning of.
For gifting, nest the squares in mini paper cups inside a tin, and tuck in a card suggesting they be served alongside our eggnog cream pie for the ultimate Christmas dessert spread. Properly stored, this candy actually tastes better on day two, once the peppermint has fully bloomed through the chocolate.
Conclusion
Peppermint white chocolate fudge is proof that the best holiday candy does not require a candy thermometer, just good chocolate and ten focused minutes. It is creamy, cool, and festive, equally at home on a crowded dessert tray, in a beribboned gift tin, or beside a mug of hot cocoa on a quiet night. The technique is forgiving, the ingredients are simple, and the result looks like something from a specialty shop.
Make a batch this weekend and keep the recipe close, because someone will ask for it before New Year. Happy holidays, and happy fudge making.
FAQ
Why did my peppermint white chocolate fudge seize while melting?
Seizing almost always comes from heat or water. White chocolate melts at a lower temperature than dark chocolate, so keep the burner on low and stir constantly, and make sure every utensil is completely dry. If it does seize, whisk in a tablespoon of warm condensed milk and it will often smooth right back out.
Will the crushed candy canes get sticky or melt into the fudge?
Candy canes absorb moisture from the air, which can make the topping tacky and cause the red color to bleed. Crush them right before using, and on humid days press the topping on just before serving instead of before chilling. Stored in the fridge in an airtight container, the topping stays crisp for days.
Can I use evaporated milk instead of sweetened condensed milk?
No, and this swap is the most common reason fudge fails to set. Sweetened condensed milk contains a high ratio of sugar to milk solids, and that sugar is what gives the fudge its firm, sliceable structure. Evaporated milk lacks the sugar, so the mixture will stay soft no matter how long you chill it.
How do I cut clean squares without crumbling the fudge?
Chill the slab until completely firm, then cut with a long sharp knife warmed under hot water and wiped dry. Wipe the blade clean between every few cuts to keep the edges sharp. If the fudge starts softening while you work, return the slab to the fridge for fifteen minutes.
How far ahead can I make this fudge for Christmas gifts?
Make it up to five days ahead and keep the cut squares refrigerated in an airtight container between layers of wax paper. For longer lead times, freeze the squares for up to three months and thaw overnight in the fridge. Add the candy cane topping just before packaging if you want maximum crunch.

Peppermint White Chocolate Fudge
Creamy no-bake peppermint white chocolate fudge with crushed candy canes.
- Total Time: 10 minutes plus 2 hours chilling
- Yield: 36 pieces 1x
Ingredients
- 3 cups white chocolate chips (18 ounces), good quality with cocoa butter listed first on the label
- 1 can (14 ounces) sweetened condensed milk, not evaporated milk
- 2 tablespoons unsalted butter, cut into small pieces
- 1 teaspoon pure peppermint extract, not mint extract
- 1/4 teaspoon fine sea salt
- 3/4 cup crushed candy canes, divided (1/2 cup for folding in, 1/4 cup for the topping)
Instructions
- Line an 8×8-inch baking pan with parchment paper, leaving a two inch overhang on two sides so you can lift the slab out later. Press the paper firmly into the corners for sharp, clean edges.
- Place the candy canes in a zip top bag, seal it, and crush them with a rolling pin into small pieces about the size of coarse crumbs. Avoid grinding them into powder, which turns the fudge pink and gritty. Measure out 1/2 cup for the filling and 1/4 cup for the topping.
- Combine the white chocolate chips, sweetened condensed milk, and butter in a medium heavy bottomed saucepan. A heavy pan distributes heat evenly and protects the chocolate from scorching on hot spots.
- Set the pan over the lowest heat and stir constantly with a silicone spatula, scraping the bottom and corners, until the mixture is completely smooth and glossy, about 5 to 7 minutes. Never let it boil, and never walk away, because white chocolate scorches faster than you expect.
- Remove the pan from the heat immediately and stir in the peppermint extract and the fine sea salt until fully incorporated. The mixture will look slightly looser for a moment, then settle back into a thick, creamy base.
- Gently fold in the 1/2 cup of crushed candy canes with just a few strokes of the spatula. Overmixing at this stage can bleed the red color through the whole batch, so stop as soon as the pieces are evenly distributed.
- Scrape the fudge into the prepared pan and spread it into an even layer, pushing it into the corners with the spatula. Sprinkle the remaining 1/4 cup of crushed candy canes over the top and press them in very lightly so they stick without sinking.
- Refrigerate the pan, uncovered, for at least 2 hours or until completely firm to the touch. For a faster set, freeze for 45 minutes, then move the pan to the refrigerator for 30 minutes more.
- Lift the slab out using the parchment overhang and set it on a cutting board. Cut into 36 small squares with a long sharp knife, running the blade under hot water and wiping it dry between cuts for the cleanest edges. Serve chilled or at room temperature.
- Prep Time: 10 minutes
- Cook Time: No bake